
EmguCV Image Process: Counting the Pixels with Histograms
參考OpenCV 2 Computer Vision Application Programming Cookbook第四章
介紹內容如下:
Computing the image histogram
Applying look-up tables to modify image appearance
Equalizing the image histogram
Backprojecting a histogram to detect specific image content
Using the mean shift algorithm to find an object
上一篇提到如何利用backprojection來做影像偵測而backprojection的結果就是一張機率影像(probability map)
也就是說結果的機率影像,越亮的部分就代表越接近要搜尋的影像內容
因此可以給定一個window大小的範圍來搜尋機率影像
透過不斷的移動window來找到範圍中機率最大的區塊
以此來決定搜尋影像的正確位置
而這個方法就是著名的:mean shift algorithm
首先要決定對影像中哪個區塊感興趣
並以此來做搜尋目標
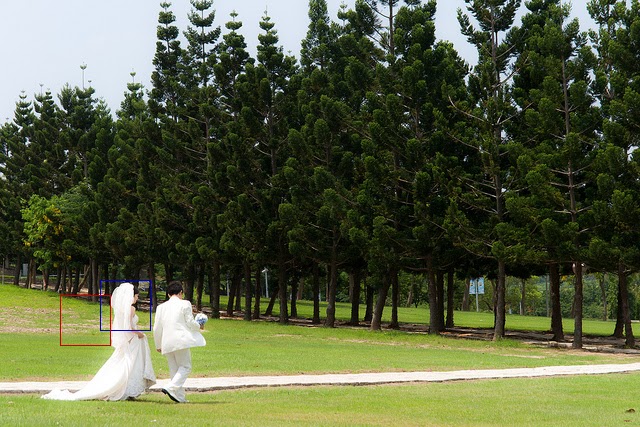
一樣以封面這張影像來做測試
這裡對新娘的區塊作搜尋
位置在:x=100、y=280,範圍:width=50、height=50

而通常在做影像搜尋時
採用的影像色域為:HSV
利用Hue的色域來做搜尋
這裡提供一個方法,需要傳入來源影像,偵測區塊
然後回傳搜尋結果區塊
Rectangle MeanShift(Image<Bgr,Byte> image,Rectangle ROI)
{
    //Convert to HSV color space
    Image<Hsv, Byte> HSVimage = image.Convert<Hsv, Byte>();
    //Get Hue, Saturation, Value image
    Image<Gray, Byte>[] HSVimages = HSVimage.Split();
    //Set the ROI
    HSVimages[0].ROI = ROI;
    //Get the Hue histogram
    DenseHistogram HueHist = GetHistogram(HSVimages[0]);
    //Reset the ROI
    HSVimages[0].ROI = Rectangle.Empty;
    //Get backprojection of Hue histogram
    Image<Gray, Byte> result = HueHist.BackProject(new Image<Gray, Byte>[] { HSVimages[0] });
    MCvConnectedComp connectedComp;
    //MeanShift algorithm
    CvInvoke.cvMeanShift(result, ROI, new MCvTermCriteria(10, 0.01), out connectedComp);
    //Get the result area
    return connectedComp.rect;
}
利用mean shift algorithm來搜尋影像這邊傳入的影像色域為一般的RGB
透過Convert<Hsv, Byte>()把色域轉成HSV
然後利用Split()把H、S、V區分出來
然後取用Hue影像來做histogram的擷取和計算backprojection
把backprojection的結果、偵測區塊(window)的起始位置(也就是偵測區塊的位置)、
MCvTermCriteria的模式、跟回傳結果
傳入cvMeanShift的方法中,並把結果回寫到connectedComp裡面
而偵測到的區塊就是connectedComp.rect
透過這樣的方式,就可以取得偵測結果
而叫用的方式如下:
//Read reference image
Image<Bgr, Byte> image = new Image<Bgr, Byte>(@"..\image.jpg");
//Bride area
Rectangle ROI = new Rectangle(100,280,50,50);
//Get the detection result
Rectangle result = MeanShift(image, ROI);
取得偵測的結果
把偵測的結果印出來
結果如下:

偵測結果多少都會有些誤差
那要如何提升準確率呢?
當取用Hue的影像時,Saturation的值其實也相當重要
當Saturation(飽和度)的值很低時,Hue的資訊會變得很不穩定也不可靠
而R、G、B的部分也是如此
而更進一步的方式
可以把low Saturation的部分忽略掉
設定一個最低Saturation的閥值,建立一張mask的影像
因此在建立histogram的時候需要帶入此mask
public DenseHistogram GetHistogram(Image<Gray, Byte> image,Image<Gray, Byte> mask)
{
    //Create a histogram
    DenseHistogram histogram =
        new DenseHistogram(
            //number of bins
            256,
            //pixel value range
             new RangeF(0, 255)
            );
    Image<Gray, byte>[] images = new Image<Gray, byte>[] { image };
    //Compute histogram
    histogram.Calculate(
        images, //Split current Image into an array of gray scale images
        true, //If it is true, the histogram is not cleared in the beginning
        mask  //no mask is used
        );
    return histogram;
}
將part1所提到的GetHistogram加入一個mask的引數並代入Calculate的方法中
這時候再修正剛剛MeanShift的方法如下:
Rectangle MeanShift(Image<Bgr, Byte> image, Rectangle ROI, int minSat)
{
    //Convert to HSV color space
    Image<Hsv, Byte> HSVimage = image.Convert<Hsv, Byte>();
    //Get Hue, Saturation, Value image
    Image<Gray, Byte>[] HSVimages = HSVimage.Split();
    //Mask to be used
    Image<Gray, Byte> lowSatnMask = HSVimages[1].ThresholdBinary(new Gray(minSat), new Gray(255));
    //Set the ROI
    HSVimages[0].ROI = ROI;
    lowSatnMask.ROI = ROI;
    //Get the Hue histogram
    DenseHistogram HueHist = GetHistogram(HSVimages[0], lowSatnMask);
    //Reset the ROI
    HSVimages[0].ROI = Rectangle.Empty;
    lowSatnMask.ROI = Rectangle.Empty;
    //Get backprojection of Hue histogram
    Image<Gray, Byte> result = HueHist.BackProject(new Image<Gray, Byte>[] { HSVimages[0] });
    //Eliminate low saturation pixels
    result._And(lowSatnMask);

    MCvConnectedComp connectedComp;
    //MeanShift algorithm
    CvInvoke.cvMeanShift(result, ROI, new MCvTermCriteria(10, 0.01), out connectedComp);
    //Get the result area
    return connectedComp.rect;
}
此時除了加入low saturation mask外這時候叫用MeanShift的方法要加入min saturation的閥值
Rectangle result = MeanShift(image, ROI, 60);代入min saturation的值,這裡設定為60
這時候再跑一次結果:
雖然書上這樣寫
但如果實際測試就會發現,加入閥值反而效果變差
原因大概就是因為所偵測的影像區塊
大部分屬於白色,白色的saturation極低
所以若是把較低的saturation濾掉,反而導致效果變差!
所以在saturation這部分要根據影像內容來做調整
(此張偵測的影像區塊的閥直設為0最佳~XD)
mean shift algorithm能夠用來做影像追蹤
在一連串的序列影像中
去搜尋指定的影像內容區塊
然後不斷地在下一張影像中搜尋
如果此時是拍連續的組圖,新娘不斷的往前走去
此時將每一張新的影像都mean shift algorithm去做偵測
紅色的框框也會不斷的移動,追蹤新娘的影像區塊
就能達到追蹤的效果
Rectangle MeanShift(Image<Bgr, Byte> sourceImage, Image<Bgr, Byte> targetImage, Rectangle ROI, int minSat)
{
    //Convert to HSV color space
    Image<Hsv, Byte> HSVimage = sourceImage.Convert<Hsv, Byte>();
    Image<Hsv, Byte> HSVimage2 = targetImage.Convert<Hsv, Byte>();
    //Get Hue, Saturation, Value image
    Image<Gray, Byte>[] HSVimages = HSVimage.Split();
    Image<Gray, Byte>[] HSVimages2 = HSVimage2.Split();
    //Mask to be used
    Image<Gray, Byte> lowSatnMask = HSVimages[1].ThresholdBinary(new Gray(minSat), new Gray(255));
    //Set the ROI
    HSVimages[0].ROI = ROI;
    lowSatnMask.ROI = ROI;
    //Get the Hue histogram
    DenseHistogram HueHist = GetHistogram(HSVimages[0], lowSatnMask);
    //Reset the ROI
    HSVimages[0].ROI = Rectangle.Empty;
    lowSatnMask = HSVimages2[1].ThresholdBinary(new Gray(minSat), new Gray(255));
    //Get backprojection of Hue histogram
    Image<Gray, Byte> result = HueHist.BackProject(new Image<Gray, Byte>[] { HSVimages2[0] });
    //Eliminate low saturation pixels
    result._And(lowSatnMask);
    MCvConnectedComp connectedComp;
    //MeanShift algorithm
    CvInvoke.cvMeanShift(result, ROI, new MCvTermCriteria(10, 0.01), out connectedComp);
    //Get the result area
    return connectedComp.rect;
}
加入target image的設定利用source image的影像區塊
並且在target image中做搜尋的動作
取得最接近的影像範圍
這裡利用source image做裁切來測試,結果如下:

利用原圖做裁切後的偵測
此圖的左邊和底部都經過裁切
所以新娘的位置稍微往左上移動了一些
藍色區塊是原始影像新娘的位置
紅色區塊則是搜尋這張裁切過的影像的位置
因此可以發現位置偵測的還算正確!!
這時候就可以自行嘗試做影像偵測和追蹤的效果了!!
沒有留言:
張貼留言