
EmguCV Image Process: Transforming Images with Morphological Operations
參考OpenCV 2 Computer Vision Application Programming Cookbook第五章
介紹內容如下:
Eroding and dilating images using morphological filters
Opening and closing images using morphological filters
Detecting edges and corners using morphological filters
Segmenting images using watersheds
Extracting foreground objects with the GrabCut algorithm
上一篇介紹如何偵測畫面中的邊線和角點位置
而本篇來介紹一下什麼是watershed transformation 中文通常翻譯:分水嶺切割法
是很常見的影像處理演算法
用來快速的將影像切割成許多同質區域(homogeneous regions)
其演算法基於一種想法
就是把影像看作是一個地形圖(topographic relief),具有高低起伏
而同質區域相對而言就是比較平坦的地形
區域之間就是由陡峭的高地所區隔
基於這樣的原則,在一開始的演算法中
很容易過度的把影像切割成許多小的區塊
這也就是為什麼在OpenCV中提供的是一種改良過的分水嶺演算法
能夠預先定義一組標記物來作為影像切割的依據
而這組標記物就是一張影像
一張已經初步標定區域的影像
而這影像的深度必須是32位元(Image<Gray, Int32>)
那直接來看看該怎麼做
首先建立一個名為:WatershedSegmenter的類別
class WatershedSegmenter
{
    private Image<Gray, Int32> _Markers;

    /// <summary>
    /// Set the maker image
    /// </summary>
    /// <param name="makers">the maker image</param>
    public void SetMakers(Image<Gray, Byte> markers)
    {
        //Convert to image of Int32
        this._Markers = markers.Convert<Gray, Int32>();
    }

    /// <summary>
    /// The idea is to mark some pixels of the image that are known
    /// to certainly belong to a given region. From this initial
    /// labeling, the watershed algorithm will determine the regions
    /// to which the other pixels belong.
    /// </summary>
    /// <param name="image">source image</param>
    /// <returns>labeling image</returns>
    public Image<Gray, Int32> Process(Image<Bgr,Byte> image)
    {
        //Apply watershed
        CvInvoke.cvWatershed(image, this._Markers);
        return this._Markers;
    }
}
這裡提供了一個SetMakers的方法可以預先傳入標記影像
然後再執行Process就會利用使用者給定的標記影像來做分水嶺切割
那一定會想說,怎麼能夠預先給定標記影像呢??
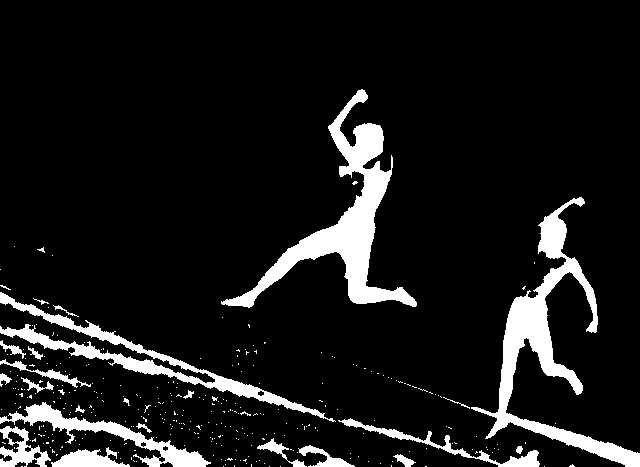
這時以上圖為例子
透過第四章及第五章的一些簡單影像處理操作
要得到兩張影像,一個是前景影像,一個是背景影像
前景影像主要是兩個跳躍的人物
而背景影像就是天空跟沙地為主
看一下程式如何實作:
//Read input image
Image<Bgr, Byte> image = new Image<Bgr, Byte>("image.jpg");

//Get the binary image
Image<Gray, Byte> binary =
    image.Convert<Gray,Byte>().ThresholdBinaryInv(new Gray(140), new Gray(255));
StructuringElementEx closeElement =
    new StructuringElementEx(5, 5, 2, 2, Emgu.CV.CvEnum.CV_ELEMENT_SHAPE.CV_SHAPE_ELLIPSE);
binary = binary.MorphologyEx(closeElement, Emgu.CV.CvEnum.CV_MORPH_OP.CV_MOP_CLOSE, 1);

//Eliminate noise and smaller objects
Image<Gray, Byte> foreground = binary.Erode(6);

//Identify image pixels without objects
Image<Gray, Byte> background = binary.Dilate(6);
background._ThresholdBinaryInv(new Gray(1), new Gray(128));
在二值化影像(binary)中的參數可自行調整以利人物的突顯,而之所以採用ThresholdBinaryInv反向二值化
是因為人物比天空和沙地的灰階值較低
要取得人物為白色區域的前景則必須做反向二值化
然後再做一次閉鎖運算來連結前景部分
而前景部分再將二值化影像作6次的侵蝕運算
背景部分則將二值化影像作6次的擴張運算,再做一次反向二值化
如下列圖示:


然後將前景和背景影像相加作為分水嶺演算法的標記影像
//Create markers image
Image<Gray, Byte> markers = background + foreground;
//Create watershed segmentation object
WatershedSegmenter watershedSegmenter = new WatershedSegmenter();
//Set markers and process
watershedSegmenter.SetMakers(markers);
Image<Gray, Int32> boundaryImage = watershedSegmenter.Process(image);
將背景影像和前景影像相加作為標記影像
設定好後就執行Process
執行結果如下:


如果只想取得框選的邊界,也就是分水嶺(watershed)的部分
可以在WatershedSegmenter加入一個方法
    /// <summary>
    /// Return watershed in the form an image
    /// </summary>
    /// <returns>watershed image</returns>
    public Image<Gray, Byte> GetWatersheds()
    {
        Image<Gray, Byte> watersheds = this._Markers.Convert<Gray, Byte>();
        watersheds._ThresholdBinary(new Gray(1), new Gray(255));
        return watersheds;
    }
透過二值化的方式,將結果的this._Markers 32位元影像先轉成8位元影像
然後將影像中pixel為非零的值,轉成255
取得的結果如下:

這裡會發現其中一個人影被切成兩塊
如果能夠將前景和背景的部分切割得更加完美的話
切割的效果就會更好!!
大家可以多試試看!!
對於此演算法有興趣的可以到Wiki中查看裡面介紹的非常詳細
下一篇將介紹利用GrabCut來擷取前景影像
沒有留言:
張貼留言